♥ My Tou ♥
All of my tutorials are written by me Any resemblance to any other tutorial is purely coincidental. Do NOT claim as your own or alter them in any way. Hotlinking is strictly prohibited. Anything you create as a result of following my Tuts is yours to do with what you wish so long as it is not for monetary gain In other words you can not sell what you make from my Tuts Thankyou♥
♥ My Blinkie ♥

Blog Archive
- 2014 (27)
- 2013 (128)
- 2012 (198)
-
2011
(481)
- December(15)
- November(34)
- October(41)
- September(37)
- August(40)
- July(32)
- June(54)
-
May(63)
- ♥ Down By The WaterHole ♥
- ♥ America Beautiful ♥
- ♥ Love ♥
- ♥ Its Magic ♥
- ♥ Escape To the City ♥
- ♥ Roll Up Roll Up ♥
- ♥ Spring Flair ♥
- ♥ Gingeralicous ♥
- ♥ My Love ♥
- ♥ Rock Around The Clock ♥
- ♥ Colour My Life ♥
- ♥ Lets Play ♥
- ♥ Hot Summer Shades ♥
- ♥ Strawberry Dreams ♥
- ♥ Funny Little Hippos ♥
- ♥ Summer Blast ♥
- ♥ Down The Rabbit Hole ♥
- ♥ Pimp My Swag ♥
- ♥ Under The Sea ♥
- ♥ What A Feeling ♥
- ♥ Sweet Serendipity ♥
- ♥ Welcome ♥
- ♥ Waiting On A Friend ♥
- ♥ In The Still Of The Night ♥
- ♥ Honestly ♥
- ♥ Cherry Blossom ♥
- ♥ Bee Free ♥
- ♥ Even Angels Will Fall ♥
- ♥ New Beginnings ♥
- ♥ Spring Dreams ♥
- ♥ A Spring In My Step ♥
- ♥ PS I Love You ♥
- ♥ Walk On The Beach ♥
- ♥ Shooting Star ♥
- ♥ I'm Yours ♥
- ♥ Its My Party ♥
- ♥ Sweet Dreams ♥
- ♥ Paradise City ♥
- ♥ Wicked ♥
- ♥ Ray Of Light ♥
- ♥ Beautiful Day ♥
- ♥ Aloha ♥
- ♥ Sweet Escape ♥
- A Spring Delight ♥
- ♥Spring Day ♥
- ♥ Seasons In The Sun ♥
- ♥ Welcome On Board ♥
- ♥ Couldve Been ♥
- ♥ Cowgirls Rule ♥
- ♥ GoodNight Time For Bed ♥
- ♥ Ocean Dreams ♥
- ♥ My Fantasy World ♥
- ♥ Butterfly Rose ♥
- ♥ Behind the Mask ♥
- ♥ Heart Breaker ♥
- ♥ Dreaming ♥
- ♥ Pretty In Pink ♥
- ♥ Days Gone By ♥
- ♥ Puppy Love ♥
- ♥ Welcome to Underland ♥
- ♥ In the Night ♥
- ♥ Brrr Its Cold OutSide ♥
- ♥ Sweet Treats Of Life ♥
- April(42)
- March(57)
- February(34)
- January(32)
- 2010 (46)
♥ My Licenses ♥
Tony Tzanoukakis-TTZ331
Keith Garvey-KG1356
GORJUSS ART-SW1123
Ismael Rac-IRL098C
Zindy-ZZT3017
PTE-PTE0365
Gild-GildLYCO
CDO-CDO-1657
AMI-AMILYCO
MPT-MPT9633
CILM-CI-1635LM
SATC-SATC1136
UYA-UYA3238
PFD-PFD_AngelLC405
The Psp Project-TPP01171
Elias Chatzoudis-EAS10190
Arthur Crowe AC780
MTA-3740
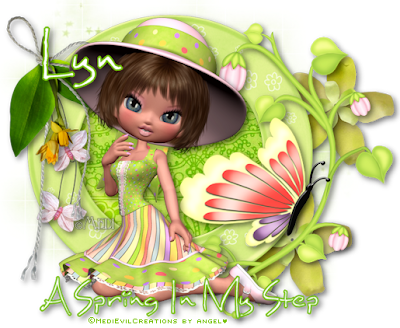
♥ A Spring In My Step ♥

To View Tag In Proper Size Click On The Tag
Supplies Needed
Scrapkit A spring in my step Kit this is PTU By Jen's Sweet Temptations you can purchase at Aussie Scraps
Here
Mask WSL_Mask84 at weescotslass Here
Font of choice or the one im using is Maxine Script
Lets Get Started
Open new image 650x550
Open Paper3 copy paste as new layer apply mask merge group
Open flower9 copy paste as new layer add drop shadow
Open Frame3 copy paste as new layer with magic wand click in frame Open Paper7 copy paste as new layer invert delete on keyboard select none drag under frame add drop shadow to frame
Open BFly1 copy paste as new layer add drop shadow
Open Decor4 copy paste as new layer resize 54 percent add drop shadow
Open flower6 copy paste as new layer add drop shadow
Open medi_sunny spring3 copy paste as new layer add drop shadow
Add your name & the words A Spring In My Step Font Maxine Script forground #72c000 background #ffffff add drop shadow
Add your copyright info
resize & save your tag
Love to see your results please email to me so i can put in my show off blog
Thankyou ♥
Written by ©Lyn(akaAngel) 23rd May 2011, any similarity to any other tutorial is purely coincidental!
♥ My Time ♥
♥ My Exclusive Tuts ♥
You can view My Exclusive tuts
Here
You will need to join the Forum
♥ User online ♥
♥ Tube Stores ♥
Labels
- Animated
- Arthur Crowe
- Autumn
- Awards ♥
- Birthday
- Christmas
- Dean Yeagle
- Easter
- Elias Chatzoudis
- FTU ♥
- Halloween
- Ismael Rac
- Jamie Kidd
- Joel Adams
- Keith Garvey
- Kiwi Fire Storm
- Lady Mishka
- Martin Abel
- Michael Landefield
- Myka Jelina
- No Scrap ♥
- Nolan Worthington
- Pinuptoons
- Popeye Wong
- PsycoJimi
- PTU
- PTU ♥
- Robin Mcquay ♥
- Sad News ♥
- Scott Blair ♥
- Sexy
- Spring
- Summer
- Suzanne Woolcott
- Thankyou ♥
- Tony Tzanoukakis
- Valentines
- Winter
- Zindy Nielson


